NWN:EE Custom Class Guide — Part 3: Class Info and Icons
Now that you've got the Eos Toolset installed and your project set up, it's time to start creating our class mod. Click over to the Custom tab and, under Class Data, right-click on the Classes header and select 'New'. This will create your new class.
Your new class page will have five sections listed on the left-hand side:
- Info
- Properties
- Spellcasting
- Extensions
- Metadata
We'll focus on the first of these sections ('Info') in this part of the guide, before moving on to 'Properties' in the next part. 'Spellcasting' will be left until a future instalment where I return to deal with spellcasting classes—'Extensions' and 'Metadata' aren't of particular interest for a beginner guide. (In the long term, the 'Metadata' section will become important for compatibility with other mods, but we don't need to worry about that for now. )
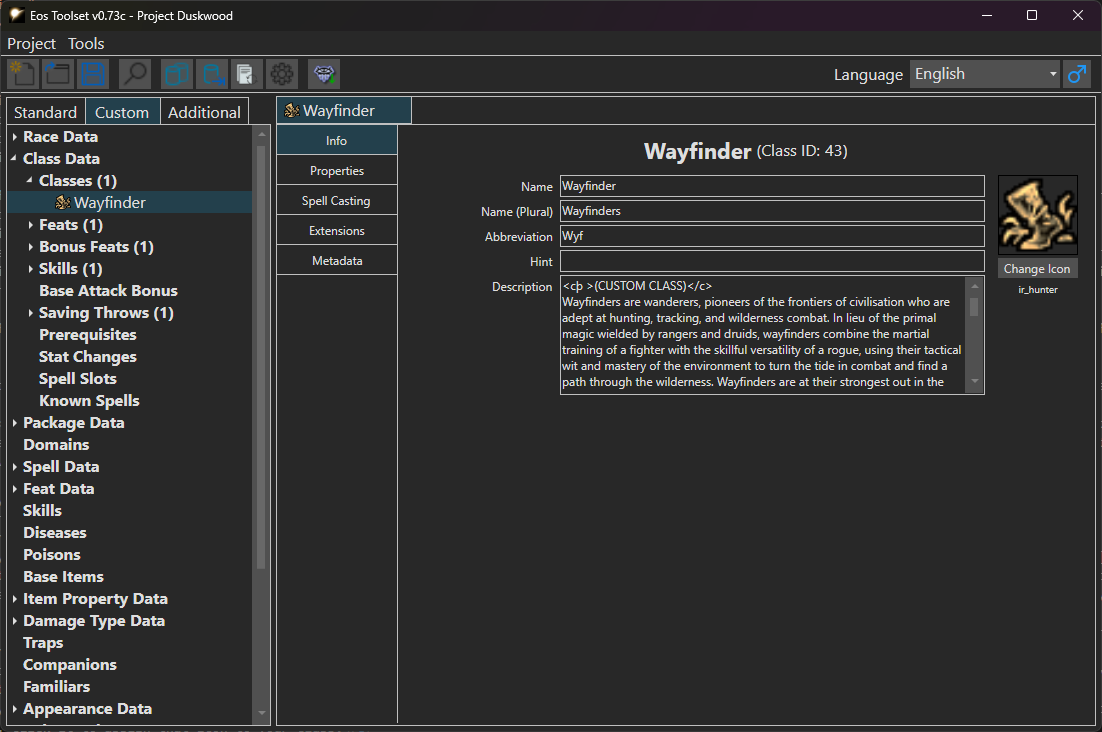
On the 'Info' page, you'll see five text fields and a blank icon space with a 'Change Icon' button underneath it. Most of this is pretty self-explanatory:
- Name is your class name in singular form ('Wayfinder');
- Name (Plural) is the plural form of the name ('Wayfinders');
- Abbreviation is a (typically 3 letter) abbreviation for the class name (I went for 'Wyf');
- Hint is a short piece of reminder text that you can use while creating your content;
- Description is the class description that shows up when you select this class at character creation or on level-up;
- and the Change Icon button allows you to set an icon for your class.
You should be able to fill in (1-3) based on your class concept or outline, and you can leave the Hint blank for now if you don't have any particular use for it. That leaves the Description and Icon, which do warrant a little more discussion. ↓ Jump to Icons.
Class Descriptions
Your class description is what players will see when choosing that class through the character creation or level-up menus. This represents, in my opinion, the first really major stylistic decision you will need to make when creating your class, for one very simple reason: the class descriptions given in NWN, kinda... well, they kinda suck.
Consider the class description given for the Barbarian class:
Barbarians are brave, even reckless warriors, and their great strength and heartiness makes them well suited for adventure. Barbarians scornfully reject the fighter traditions of arms training and discipline, instead tapping into a powerful rage that makes them stronger, tougher, and better able to withstand attacks. They only have the energy for a few such displays per day, but it is usually sufficient. Constant exposure to danger also gives barbarians a sort of "sixth sense," a preternatural ability to sense danger and dodge attacks, and their running stamina is legendary.
- Alignment Restrictions: Any nonlawful.
- Hit Die: d12.
- Proficiencies: All simple and martial weapons, light armor, medium armor, and shields.
- Skill Points (Int Modifier * 4 at 1st level): 4 + Int Modifier.
- Ex-Barbarians: Barbarians are unable to progress in levels if their alignment ever becomes lawful.
Compare this to the description of the barbarian class on the NWN wiki. There's a fair bit of information missing, and some parts of the description that could even be potentially misleading—for example, with all this talk of a 'preternatural ability to sense danger and dodge attacks', you would be forgiven for thinking barbarians have Reflex as a strong save; but they do not, their only strong save is Fortitude, something that is in no way communicated by the class description. If a player wants to know things as simple as what feats they gain when, what their primary saving throws are, or even which skills are class skills for their class, they will need to open a wiki page or otherwise get that information from another source, because the class description simply does not tell them.
Of course, this is not true to the same degree of all class descriptions in the base game— compare the above class description to that given for the Pale Master class, which still omits save and BAB progression information but which does at least give a level-by-level breakdown of the class's feat progression.
This here is where the stylistic decision comes. The budding modder has three main options:
- Make their class descriptions fit with the official class descriptions, at the cost of having the same gaps and weaknesses.
- Update every single class description for the official classes to match the standard they want for their own class descriptions.
- Give good descriptions to their classes and let them mismatch with some of the official class descriptions.
In this guide, I'm going to follow option (3)—I will try to develop detailed class descriptions that hew as close in style to the official class descriptions as possible, while simply biting the bullet on the fact that these new, more detailed descriptions will look somewhat out-of-place alongside the more spartan descriptions attached to official classes.
When it comes to deciding what to put in your class description, I would generally aim to include a short evocative descriptive paragraph followed by the key information from your class outline, and maybe a section detailing what feats you gain at what levels and how those feats develop as a character progresses in that class. As an additional flourish, I like to include a warning at the top of the class description indicating that this class is custom content, usually in red text so it stands out. You can make text red in your class description by enclosing it in colour tags like so: <cþ >Your Text Here</c>. For more on using coloured text in your module, see gaoneng's 'The Hitchhiker's Guide to Color Tokens'.
Let's contrast the barbarian description above with what I went for with my Wayfinder class:
<cþ >(CUSTOM CLASS)</c>
Wayfinders are wanderers, pioneers of the frontiers of civilisation who are adept at hunting, tracking, and wilderness combat.
In lieu of the primal magic wielded by rangers and druids, wayfinders combine the martial training of a fighter with the skillful versatility of a rogue,
using their tactical wit and mastery of the environment to turn the tide in combat and find a path through the wilderness.
Wayfinders are at their strongest out in the wilds, where their close familiarity with the terrain allows them to strike foes with precision and inflict deadly wounds.
Yet they are no slouch in the city either, combining a strong progression of both feats and skills to gain the upper hand over their opponents.
- Hit Die: d8.
- Base Attack Bonus progression: +3/4 levels.
- Primary Saving Throw(s): Fortitude, Reflex
- Proficiencies: All simple and martial weapons, light armor, medium armor, and shields.
- Skill Points ( (6 + Int Modifier) * 4 at 1st level): 6 + Int Modifier.
- Class Skills: Animal Empathy, Craft Armor, Craft Trap, Craft Weapon, Disable Trap, Discipline, Heal, Hide, Listen, Move Silently, Parry, Ride, Search, Set Trap, Spot, Tumble.
ABILITIES:
Level
1: Hunter's Sense - Add Wisdom modifier to attack rolls and weapon damage in wilderness areas.
2: Uncanny Dodge I - Retain Dexterity bonus to AC even when caught flat-footed;
Woodland Stride - Immune to hindering terrain.
3: Trackless Step - +4 competence bonus to Hide and Move Silently in wilderness areas;
Wayfinder Fast Movement - +10% movement in wilderness areas.
5: Evasion - Take no damage, instead of half, on a successful reflex save;
Uncanny Dodge II - +1 to reflex saves to avoid traps.
10: Uncanny Dodge III - +2 to reflex saves to avoid traps.
11: Hide in Plain Sight - Can use the hide skill even while being observed.
13: Uncanny Dodge IV - +3 to reflex saves to avoid traps.
15: Improved Evasion - Half damage on a failed reflex save.
16: Uncanny Dodge V - +4 to reflex saves to avoid traps.
19: Uncanny Dodge VI - +5 to reflex saves to avoid traps. Improves by +1 for every 2 additional levels gained.
BONUS FEATS
The wayfinder gains a bonus feat at 1st and 4th level, and every 2 levels thereafter.
Icons
Your class icon is an important part of your class's visual identity in the game—alongside your class name, it will be one of the first things players see when your class shows up in the class selection menu.
Your icon should be a 32x32 pixels .tga file. If you want it to fit with the other class icons and the colour scheme of the menu, it
should be a metalic gold colour. You can edit these files in the
GNU Image Manipulation Program (GIMP). I've heard you can also work with .tga in
Adobe Photoshop if you're rich or yo-ho-ho.
Reusing Icons
The best possible practice would be to draw a new icon for your class, or hire an artist to do it for you. This will give you a totally original icon to really establish your class identity. But what do you do if you're mid-to-bad at art, you don't want to wait to create your mod until you develop a substantial artistic skill from the ground up, and you don't have the money to hire an artist?
My default solution is to take a leaf out of the old JRPG handbook and recolour and reuse an asset used elsewhere in the game. In this case, I will find a feat or effect icon that captures the vision for my class, recolour it to something close to the class icon colour, and use that.
In order to do this, you're going to need to extract the icon files from your copy of NWN. To do that, you're going to want to grab the latest release of
the NWN Explorer. Once you've downloaded and opened the Explorer,
click File>Open Neverwinter Nights (or hit Ctrl+Alt+N). In the navigation bar on the left, expand 'NWN Main Data', then click data\aurora_gui.bif.
From here, you want to right click on each of 'Images, Icon, Feat' and 'Images, Icon, Other' and hit Export, saving the extracted data in a directory of your choice.
Now navigate to whichever directory you saved those images in, copy whichever ones you want to work on (leaving the originals as backups!) and get to work.
For my Wayfinder class, I'm going to use the Trackless Step feat icon, colour-shifted to the gold colour of class icons. It's not a perfect match, but it's close enough at distance that I think it won't look out-of-place in the class selector menu.
Importing your Icon
Once you've got an icon you're happy with, you want to save it as a .tga file. The usual naming convention for class icons is ir_[classname].tga.
Note that there is a 16 character limit on the icon name prior to the file type suffix (i.e. everything before .tga must be 16 characters or under), so you may
need to abbreviate your class name to fit. I'll be going with ir_hunter.tga for this guide, as 'hunter' was an alternative name for the Wayfinder class in
my early sketches, it's got fewer characters, and it doesn't clash with any other custom classes I expect to be included in this project.
Next, you want to copy this .tga file into the /external/ folder of your Eos Toolset project directory. You'll find this wherever you chose to
save your project when you created it.
Now open the Eos Toolset and click the Reload External Files button—it looks like a stack of papers with a circle formed of two arrows in the bottom-right corner; the hotkey on Windows at least is F5. You should get a message saying 'External files reloaded successfully.'
Lastly, navigate to your class page and click the 'Change Icon' button. Type in some or all of the icon name (excluding the .tga) and your icon should pop up in
the list. Click it to assign that icon to your class.
Progress so far
That pretty much brings us to the end of the Info page. Your page should look something like the image below, with name (singular and plural), abbreviation, description, and icon filled in.
If you were inputing this class through the traditional method of directly editing classes.2da, you would've completed the first 7 columns of the row at
this stage. The Eos Toolset automatically handles assigning an ID and label to the class, as well as automatically generating the lower case form of the class name
(column 5 in classes.2da). The singular form of the class name is column 3, the plural is column 4, the description is column 6, and the icon reference is column
7.
With that, we're ready to move on to the Properties page, which handles all of the main mechanics of the class (outside of spellcasting, which I'll come back to in a future guide/instalment).
| ← Back (Part 2: The Eos Toolset) | Top |